参照yolov5-6.0对图片进行检测


首先需要载入模型数据,(以下代码需要在yolov5-6.0工程文件下运行)

首先导入各种包
1
2
3
4
5
import torch
from config import *
from models.experimental import attempt_load
from utils.general import check_img_size
from utils.torch_utils import select_device
获取pt模型参数的函数
1
2
3
4
5
6
7
8
9
10
11
12
13
14
def get_model():
device = select_device('')
# print(device.type)

half = device.type != 'cpu'

model = torch.jit.load(WEIGHTS) if 'torchscript' in WEIGHTS else attempt_load(WEIGHTS, map_location=device)
stride = int(model.stride.max()) # model stride
names = model.module.names if hasattr(model, 'module') else model.names # get class names
if half:
model.half()
imgsz = check_img_size(IMGSZ, s=stride)

return model, device, half, stride, names, imgsz

构造检测函数

导入相关包
1
2
3
4
5
6
import numpy as np
import torch
from config import CONF_THRES, IOU_THRES, LINE_THICKNESS, HIDE_LABELS, HIDE_CONF
from utils.augmentations import letterbox
from utils.general import non_max_suppression, scale_coords, xyxy2xywh
from utils.plots import Annotator, colors
这里我们把检测函数命名为out_img
1
2
3
4
5
6
7
8
9
10
11
12
13
14
15
16
17
18
19
20
21
22
23
24
25
26
27
28
29
30
31
32
33
34
35
36
37
38
39
@torch.no_grad()
def out_img(img0, model, device, half, stride, names, imgsz):
# Padded resize
img = letterbox(img0, imgsz, stride=stride, auto=True)[0]
# Convert
img = img.transpose((2, 0, 1))[::-1] # HWC to CHW, BGR to RGB
img = np.ascontiguousarray(img)
model(torch.zeros(1, 3, *imgsz).to(device).type_as(next(model.parameters()))) # run once
img = torch.from_numpy(img).to(device)
img = img.half() if half else img.float() # uint8 to fp16/32
# 归一化处理
img = img / 255.0 # 0 - 255 to 0.0 - 1.0

if len(img.shape) == 3:
img = img[None] # expand for batch dim

pred = model(img, augment=False, visualize=False)[0]
# NMS
pred = non_max_suppression(pred, CONF_THRES, IOU_THRES, None, False, max_det=1000)
# Process predictions
det = pred[0]

im0 = img0.copy()
gn = torch.tensor(im0.shape)[[1, 0, 1, 0]] # normalization gain whwh

annotator = Annotator(im0, line_width=LINE_THICKNESS, example=str(names))
xywh_list = []
if len(det):
# Rescale boxes from img_size to im0 size
det[:, :4] = scale_coords(img.shape[2:], det[:, :4], im0.shape).round()
# Write results
for *xyxy, conf, cls in reversed(det):
c = int(cls) # integer class
xywh = (xyxy2xywh(torch.tensor(xyxy).view(1, 4)) / gn).view(-1).tolist() # normalized xywh
xywh_list.append(xywh)
label = None if HIDE_LABELS else (names[c] if HIDE_CONF else f'{names[c]} {conf:.2f}')
annotator.box_label(xyxy, label, color=colors(c, True))
im0 = annotator.result()
return im0, xywh_list #返回的im0为标记好的图像文件,xywh_list为标记的坐标信息(x为图像中心点所在像素的横坐标,图像左上角为原点,y同理,w为被标记图像在图像中的像素宽,h为高度)

最后利用main函数作为程序入口

依旧是先导入
1
2
3
from PIL import Image
from get_model import get_model #这是导入函数
from out_img import out_img #这是导入函数
构造main文件(这是简单的一个图片的导入)
1
2
3
4
5
6
7
8
9
img_outpath = 'the path you want to save your photo'  # 输入图片的路径
img_inpath = 'the path of file that you want to detect' # 保存结果图片的路径,保存路径需要精确到被保存图片的文件名,文件名由你决定

model, device, half, stride, names, imgsz = get_model() # 读取模型参数
img0 = Image.open(img_inpath) # 载入图片
im0, xywh_list = out_img(img0, model, device, half, stride, names, imgsz) # 对载入图片进行检测
im0.save(img_outpath) # 保存检测后的图片
print('图片已保存到' + img_outpath)
print('这些内容名称以及相应参数为' + xywh_list)

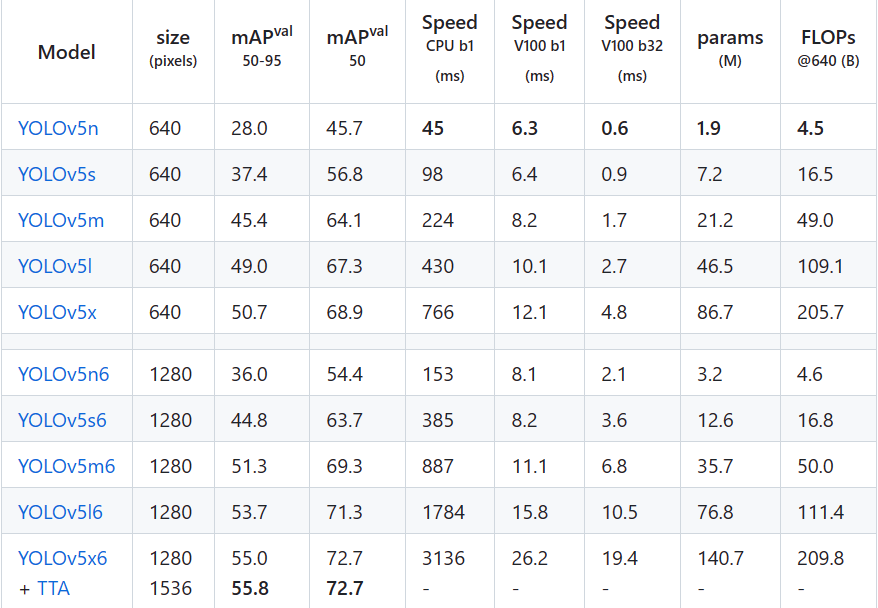
最后run一下main文件就能得到结果啦,.pt文件可以自己去github下载。

[yolov5开源地址](ultralytics/yolov5: YOLOv5 🚀 in PyTorch > ONNX > CoreML > TFLite (github.com))

122

最后的字母n表示最小的模型识别内容少,但是速度快,s模型比n大,识别速度比n慢,往下以此类推。